Thanks to the popularity of Microsoft Dynamics AX (aka Axapta), there are tons of blogs containing useful insights and interesting facts on AX. The community is ever-growing and feels great to be a part of it. With this blog, I will add my two cents to the knowledge base and enforce my concepts as well. I will focus more on relatively unknown facts about AX as the fundamental aspects are thoroughly covered. So, let's begin.
Last
post I discussed Strategy Design Pattern, continuing with the same topic, today
I will write something about Decorator Design Pattern.
In
case of Strategy, you encapsulate code in external algorithms for easy use
rather than spreading it around inside your core code and modifying it
throughout that code.
The
Decorator takes a different approach. Instead of using external algorithms,
this design pattern is all about using wrapper code to extend your core code.
The
formal definition of the Decorator pattern from the GoF book (Design Patterns:
Elements of Reusable Object-Oriented Software) says you can, “Attach additional
responsibilities to an object dynamically. Decorators provide a flexible
alternative to subclassing for extending functionality.”
Lets
see how the example code looks like.
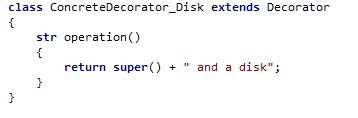
1.First you define an interface class with a
method operation() of type string.
2.Next you define a class that implements this
interface and method operation() returns “computer”.
3.Now you define an abstract class that
implements the interface you defined earlier. This class is actually a pass
through class with a method new() having a parameter.
4.Now you define two concrete classes that
extend the abstract class you created in previous step. Notice the operation()
methods.
5.Finally you need a job to put all the pieces
together.
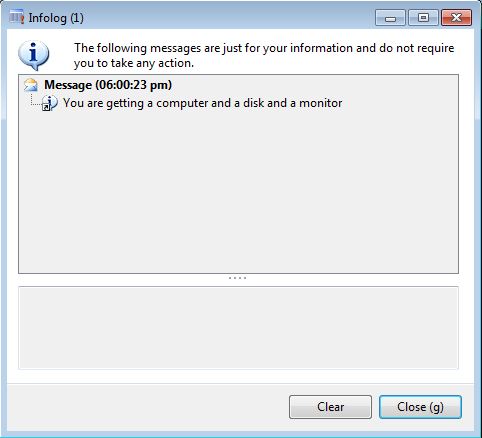
6.The infolog
This is what is happening. When you call the monitor’s operation() method, the following occurs in this order:
1. The monitor’s operation() method calls the disk wrapper’s operation() method.
2. The disk wrapper’s operation() method calls the computer object’s operation() method.
3. The computer object’s operation() method returns the text "You are getting a computer and a disk".
4. The monitor wrapper’s operation() object then adds "and a monitor" to give you the resulting final string, "You are getting a computer and a disk and a monitor".
Hope the post was clear and feel free to ask me for the xpo.
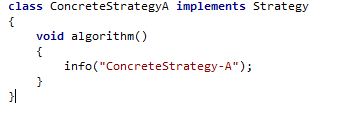
Design Patterns help developers solve recurring complex problems in their code. We see lot of inheritance getting used in AX code. Inheritance is a good OOPS concept and helps in writing smart code. But only to an extent. In some situations, code becomes too deep, too hard to maintain, debug or upgrade. That's when design patterns come to the rescue. The Gang of Four (GOF) introduced the concept of Design Patterns in their book http://www.amazon.com/Design-Patterns-Elements-Reusable-Object-Oriented/dp/0201633612 There are a total of 23 patterns in the book. I always wanted to write on this topic and this post will cover one of the patterns - Strategy Design Pattern. Quoting from the GOF book, the Strategy design pattern is defined as “Define a family of algorithms, encapsulate each one, and make them interchangeable. Strategy lets the algorithm vary independently from clients that use it.” I will use some sample AX code to supplement my post. 1. First we define our interface class named Strategy with one method algorithm.
2. Then we define three concrete classes aptly named ConcreteStrategyA, ConcreteStrategyB and ConcreteStrategyC with their implementations of method algorithm.
3. Next we have a class StrategyContext which is actually a pass through class whose working we will see shortly in the job.
4. Finally we define the job. We initialize the three concrete classes, define a switch case, call the contextInterface method and depending on the value in the variable condition, algorithm method of the corresponding concrete class is called.
5. The Infolog.
The Strategy Design Pattern says that you should extract the volatile parts of your code and encapsulate them as objects; you can use those objects as you need them. You can customize your code by creating composites of objects. At runtime, you just use polymorphism to choose the object(s) you want to work with. Feel free to ask me for the xpo. I will be posting more posts on this topic.
The global address book, GAB, is a central record in the system that unifies all the different roles of a person or organization. An organization could be a customer and vendor in one or more companies. The GAB record is the connection point for all of the different roles that the organization plays.
In Microsoft Dynamics AX 4.0, all of the data associated to an entity was stored in the entity table. This means that tables such as the customer table stored the name, address, and contact information. Microsoft Dynamics AX 2009, introduced the global address book, and this was the beginning of the transition to a common repository of this data. While the information was still stored in the entity tables, it was synchronized to the global address book tables. Therefore, it was actually stored in multiple places, both in the CustTable and in the DirParty tables.
In Microsoft Dynamics AX 2012, by removing, the synchronization and duplicate fields from the entity tables, and instead storing the data in the common address book tables, this transition is complete. In line with the architecture efforts to normalize the data, the address data will be taking advantage of the new enterprise structure. New addresses will require a location field. The Name address field in Microsoft Dynamics AX 2009 will be converted to a location. On upgrade from Microsoft Dynamics AX 4.0 or Microsoft Dynamics AX 2009, the system will add a value to this field if one does not exist already. The use of Virtual Company for Address Books will be removed and a party can be associated to one or more address books. Party tables are now global which means the need for setting up virtual tables is eliminated. Address table is deprecated and replaced by the global table LogisticsPostalAddress.
There are a number of exciting changes to the whole address functionality in AX 2012, I will discuss few in this post.
1. Verification of existing parties is optional.
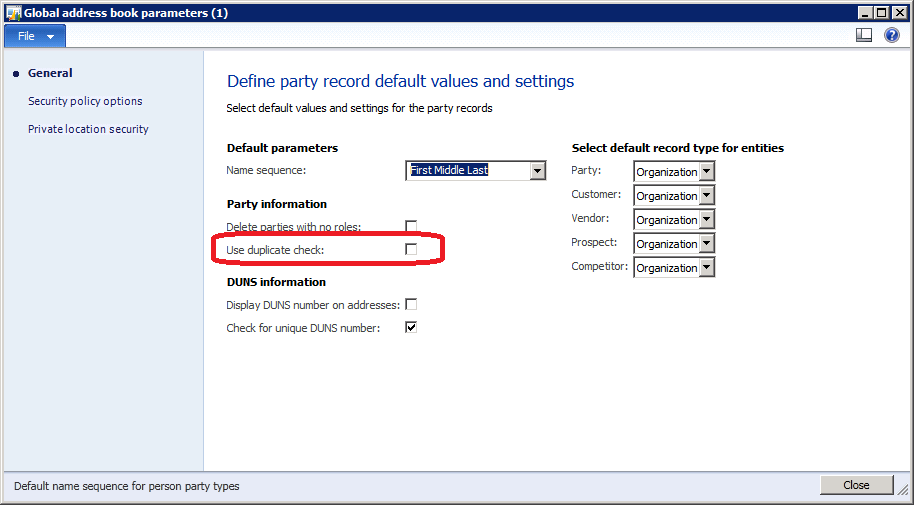
Example: Julie Hanson exists as a party in the system already. Users create a new customer and type in Julie Hanson in the name field and tab to leave the field and save the record. If duplicate check is turned on, in the address book parameters, then users will get the duplicate detected dialog displaying the existing party records with the same name. If duplicate check is not turned on, the system will never warn users that there is another party with the exact same name.
To open the main setup form, click Organization administration, click Setup, and then click Global address book, click Global address book parameters. Under General, in group Party information, there is a check box Use duplicate check, telling the system to search for duplicates in the global address book on entry of a new record.
2. Microsoft Dynamics AX 2012 provides default data for country/region codes and address formats. Over 250 Microsoft approved country/region codes are provided with Microsoft Dynamics AX 2012. Postal address fields that are displayed upon entry are based on the address format associated to the country/region code. Example: While entering a new address for country Canada, the address fields on display will be different if the country selected was Brazil. Since both the countries have different address formats. The address fields on display will change on the fly and any data entered will be lost.
3. Multiple roles per address. The same address can be designated for different types of usage such as delivery and remit to. In earlier versions, you would enter the same address twice for different purpose/role. Example: Contoso International sells and purchases goods and services from the company Fabrikam. Contoso International has a head office, three production facilities and four sales offices. Each of the locations can accept deliveries but the receivables processing is centralized at the head office. Hence, the head office also needs to be a remit to address. 4. Addresses are date effective. Example: Lamps Inc. is a customer of Fabrikam. Lamps Inc. is moving its main production site in 30 days and has sent a change of address to Fabrikam. For historical reporting purposes, Fabrikam needs to maintain Lamps Inc. old address even though it will no longer be active 30 days from now.
5. Verification of ZIP/Postal Codes is optional. In previous versions of Microsoft Dynamics AX, in order to use ZIP/Postal Codes the reference data had to be set up, defined, and could not be of free text format when users entered an address. In Microsoft Dynamics AX 2012, options were added to turn on verification for ZIP/Postal Codes, cities, and districts. If the verification option is not marked, these fields can be entered as free text and reference data does not have to be defined in order to use the value. If the verification option is marked, users will have to define this reference data prior to using it in an address. To open the setup forms, click Organization administration, Setup, and then click Addresses. Under Parameters tab, there are three checkboxes, the first one is Zip/Postal code.
In Microsoft Dynamics AX 2012, the Application Integration Framework (AIF) underwent a number of dramatic changes and is now known as Services. There are more number of WCF service hosts and simplified forms and concepts.
There are new terms like Service Groups and Ports (Basic, Enhanced), which we need to understand.
Service group - collection of Services. Why would you collect multiple services under a group? Consider a case of creation of a sales order and customer specified doesn't exist in AX. You will need another service for creation of customer. Both these services can be now clubbed together under one Service group. Also, with a single WSDL, you only need to add one service reference in Microsoft Visual Studio to access all of the objects from the services in the Service group.
Ports - Erstwhile (read AX 2009) local endpoints, channels and endpoints have been consolidated into a port.
Basic port - created automatically as soon as you have deployed your Service group. Also, Basic ports are deployed as WCF services only to the AOS and use the NetTcp adapter.
Enhanced port - created manually. They give you several options around hosting, adapter types, document processing, error handling and security. The choices of adapter types are:
• File system adapter
• HTTP- To consume services over the Internet, you must use the HTTP Adapter and host services on IIS. IIS routes all service requests to the AOS. Regardless of the origin of the service request, Internet or Intranet, all the service requests are processed on the AOS.
• MSMQ - Similar to File adapter. For the URI of the Address and Response addresses browse to the directories that are mail queue directories.
• NetTcp- Use this adapter when you want to use a service on the Intranet and not on the Internet.
Using the File Adapter
In this example, you will configure an enhanced port to use the file system adapter. Then you will import a sales order using the port.
Overview of the task
1. Create a new enhanced port.
2. Set the Adapter to File system adapter.
3. Set the default file owner to the administrator account.
4. Add the SalesOrder create operation to the list of service operations exposed on this port.
5. Activate the port.
6. Create an xml document that contains a sales order.
7. Run an X++ job that runs the AIF classes and imports the sales order.
Step by Step Instructions Create and Activate an Enhanced Port
1. In Windows Explorer, create a
Services directory and inside of it create an Inbound and an Outbound
directory.
2. In Microsoft Dynamics AX under System
administration, click Setup, click Services and Application
Integration Framework, click Inbound ports and then click New.
3. Enter the name FileSystemAdapterPort
for the port.
4. Click Register Adapters to
ensure you see all of the adapters available in the environment.
5. Click Register services to
ensure you see all of the service operations available in the environment.
6. In the Address section for the
Adapter field, select File system adapter.
7. In the Address section for the URI
field, click the dropdown and navigate to the Services - Inbound directory.
8. In the Response address section
for the Adapter name, select File system adapter.
9. In the Response
address section for the URI field, click the dropdown and navigate to the Services
- Outbound directory.
10. In the Address section, click Configure.
11. Mark the Enable default file
owner and select the Admin user. Admin will be the default owner of
the xml files submitted to the Inbound directory.
12. Click Services operations.
13. From the Remaining service
operations list, select SalesSalesOrderService.create and click the <
arrow.
14. Click Close.
15. Click Activate.
16. Close the ports
form.
Create a XML File
1. In Windows, open Notepad.
2. Copy the
following to a new Notepad document:
(Note: Not able to display the below XML code in the blog, somehow displays junk characters, workaround i found is to use # in front of each row. Take care to remove the # in your actual code.)
3. Save the file in
the Services - Inbound directory. Name the file SalesOrder.xml.
Create a Job
1. In the AOT,
create a new job with the following code in it:
AifGatewayReceiveService agrs = new AifGatewayReceiveService();
AifInboundProcessingService aip = new AifInboundProcessingService();
AifOutboundProcessingService aop = new AifOutboundProcessingService();
AifGatewaySendService agss = new AifGatewaySendService();
;
agrs.run();
aip.run();
aop.run();
agss.run();
2. Save the job.
3. Execute the job.
Verify the Results
In AX,
navigate to Sales and marketing, click Common, click Sales
orders and then click All sales orders. You should have a new order
created for the customer account 1101. If you do not have a new sales order in
Microsoft Dynamics AX, navigate to System administration, click Services
and Application Integration Framework and then click Exceptions to
see the exceptions logged.
Windows PowerShell is a command-line scripting tool that lets administrators interact directly with Microsoft Dynamics AX to add users and user authentication, manage models, and manage configurations for communication between Microsoft Dynamics AX and Microsoft SQL Server Reporting Services. In addition, administrators can use Windows PowerShell cmdlets to create scripts. This term is pronounced "command-lets."
After you install Microsoft Dynamics AX, the applicable Windows PowerShell cmdlets are available from either the Microsoft Dynamics AX Management Shell or the Windows PowerShell console.
There is another a command-line utility called AXUtil, but this will be discontinued in a future version. So it's better we stick to PowerShell.
Access the Microsoft Dynamics AX 2012 Management Shell
1. On the Start menu, click All Programs.
2. Click Administrative Tools.
3. Click Microsoft Dynamics AX 2012 Management Console.
AX 2012 has a new concept of UnitOfWork aimed at managing database transactions. It's better than ttsbegin/ttscommit way of batching multiple transactions since that had some shortcomings like
• transactions will start and commit on the client, UOW is on server.
• transactions are open for a longer period
• multiple RPC calls to the server, UOW takes a single call for multiple transactions
• blocked in case there is user interaction inside tts scope
One interesting feature in UOW is that it automatically propagates the primary key value to the corresponding foreign key field, when the row with the foreign key field is inserted.
Methods at work
The UOW object takes a series of individual rows as parameters. It is designed to successfully process each row or it will reject all changes if any issue arises. In addition, the UOW class cannot support set based operations. It operates only on the specific rows that it is given.
Insert
insertOnSaveChanges()
Select
optimisticLock keyword on the select statement for retrieving the objects for updates/deletes
Update
updateOnSaveChanges()
Delete
deleteOnSaveChanges()
Persist to DB
saveChanges()
Example
We will create a parent/child tables example to understand UOW.
1. Create two tables.
TabSale has a primary key (RecId) foreign relation with TabLineItemOfSale.
Fields for the parent table TabSale:
• SaleName
• SaleComment
Fields for the child table TabLineItemOfSale:
• LiosName
• LiosComment
• MasterSaleRecIdFky – the foreign key
Create a foreign key relation on TabLineItemOfSale, name it TabSale, table property as TabSale, RelatedTableRole as masterSale and CreateNavigationPropertyMethods as Yes.
Note that the method masterSale is not a physical instance method on TabLineItemOfSale but is created run time to propagate the primary key value to the foreign key.
When you set the CreateNavigationPropertyMethods property to Yes on a table relation, the system generates navigation methods for the table buffer class. A navigation method links two table buffer instances by their foreign key relationship. The UnitOfWork class is one area where this navigation linkage is used.
The name for a navigation method is copied from the value of the RelatedTableRole property on the table relation. This is true when the RelatedTableRole value is set explicitly in the Properties window, and when the RelatedTableRole value is generated by setting the UseDefaultRoleNames to Yes.
2. Create a class UnitOfWorkEg with a server static method runUnitOfWorkEg and paste below code in that.
server static public void runUnitOfWorkEg()
{
    UnitOfWork uow = new UnitOfWork();
    TabSale tSale; // Buffer for parent table.
    TabLineItemOfSale tLineIos; // Buffer for child table.
    int64 i64MasterSaleRecIdFky;


    // Delete all rows, without using UoW.
    delete_from tLineIos;
    delete_from tSale;
    // Prepare a parent row for insert.
    // We let the system assign a RecId value, the primary key.
    tSale.SaleName = "Big";
    tSale.SaleComment = "A row in the parent table.";

    // Prepare a child row for insert.
    // Again, we let the system assign a RecId value, the primary key.
    // We also let the system assign SaleRecIdFky foreign key value!
    tLineIos.LiosName = "Chair";
    tLineIos.LiosComment = "To sit in.";
    // Method name is the RelatedTableRole property value.
    tLineIos.masterSale(tSale);
    // Prepare the UoW to do the inserts.

    uow.insertOnSaveChanges(tSale);
    uow.insertOnSaveChanges(tLineIos);
    // Before saving changes, prepare more inserts.
    // Add a second child to the current parent record.
    tLineIos.LiosName = "Desk";
    tLineIos.LiosComment = "To work at.";
    tLineIos.masterSale(tSale);
    uow.insertOnSaveChanges(tLineIos);
    // Add a second pair of parent + child records.
    tSale.SaleName = "Small";
    tSale.SaleComment = "Another row in the parent table.";
    tLineIos.LiosName = "Shirt";
    tLineIos.LiosComment = "To wear.";
    tLineIos.masterSale(tSale);
    uow.insertOnSaveChanges(tSale);
    uow.insertOnSaveChanges(tLineIos);
    // Make the changes to the SQL database, and commit.
    uow.saveChanges();

    //------------------------------------
    // Read the newly inserted child row.
    // Use optimistic concurrency, in case OccEnabled=No on the table.
    select optimisticLock
    LiosComment, MasterSaleRecIdFky
    from tLineIos
    where tLineIos.LiosName == "Desk";
    i64MasterSaleRecIdFky = tLineIos.MasterSaleRecIdFky;
    tLineIos.LiosComment = tLineIos.LiosComment + " Appended.";
    // Prepare the UoW to do the update. Then update.
    uow.updateonSaveChanges(tLineIos);
    uow.saveChanges();
    // All changes are complete. Display the results.
    tLineIos = null;
    tSale = null;

    select LiosName, LiosComment, RecId, MasterSaleRecIdFky
    from tLineIos
    where tLineIos.LiosName == "Desk";

    select SaleName, SaleComment, RecId
    from tSale
    where tSale.RecId == i64MasterSaleRecIdFky;
    // Display the parent RecId and the matching child foreign key.
    info(strFmt("TabSale: RecId=%1 , SaleName=%2",
    tSale.RecId, tSale.SaleName));
    info(strFmt("TabLineItemOfSale: MasterSaleRecIdFky=%1 , LiosName=%2 , RecId=%3 , LiosComment=%4",
    tLineIos.MasterSaleRecIdFky, tLineIos.LiosName, tLineIos.RecId, tLineIos.LiosComment));
}
3. Create a job UnitOfWorkExample with below code.
In AX 2012, Table relationships have gone through many changes with many new kind of keys coming into the picture. I had a previous blog entry here.
Today let's see Foreign Keys, Replacement Keys in action.
We will find out that it is possible now to define parent/child relationship without having to define the same primary key in both the tables. For eg, till AX 2009, a header/lines relationship used to exist on the basis of a unique key like SalesId field in both SalesTable and SalesLine. This is no more required in AX 2012. Such relations are defined on RecIds and values are displayed on forms depending on what is defined on your ReplacementKey (thats why the name Replacement!)
Lets go one by one.
1. Table HeaderTable
2. HeaderTable has two fields AccountId and Name
3. Two indexes AccountIdx and NameIdx. Both have their AllowDuplicates property set as No and AlternateKey property set as Yes.
4. Header table's ReplacementKey property set as NameIdx.
5. Second table LineTable will have two fields LineName and AccountId.
6. Create an Int64 type EDT HeaderTableRefRecId with property ReferenceTable as HeaderTable and Extends as RefRecId (this is important!)
7. Drop this EDT on LineTable.
8. Click Yes on the prompt.
9. New field, new index and new relations are created. Relation is between HeaderTable's RecId and the new EDT field HeaderTableRefRecId.
10. Create a Form with these two tables as datasources. Drop the fields in HeaderView and LineView nodes. (Important Note: when you drop the HeaderTableRefRecId field on the Line node, it uses a special ReferenceGroup control, which stores a int64 recId field of the Header table but effectively displays Name. You cannot use a normal int64 control.)
11. Create some dummy records within the table browser. Set the field HeaderTableRefRecId's value from the dropdown. Notice the values displayed in the dropdown. One is the header's RecId and second is the Name, the ReplacementKey.
12. Checkout the values on the form. Field HeaderTableRefRecId's value on UI will not be some random RecId but the Name of the header record. This happens because of the ReplacementKey.
A
valid time state table helps you simplify the maintenance of data for which
changes must be tracked at different points of time.
Rows that are
valid at different points of time
Tracks historical
changes
Tracks changes
that will be valid in future
ValidTimeStateFieldType
property. Once set and if there is data in the table, AX will not allow
property to be made None.
AX kernel
prevents overlaps among date ranges of records keeping the data valid.
ValidFrom and
ValidTo columns are added automatically. Can be type Date or UtcDateTime.
Records in this
table cannot have multirow insert, delete or update operations. They are done
one row at a time.
A
ValidTimeStateTable should also have an Index that will be used as an
AlternateKey.
How to make a Valid Time State Table?
Create a new table and set the property ValidTimeStateFieldType to Date or UtcDateTime.
Create a new index that will be used as an AlternateKey.
Add the ValidFrom and ValidTo fields to the index
Set the AllowDuplicates to No
AlternateKey to Yes
ValidTimeStateKey to Yes
ValidTimeStateMode can be Gaps or NoGaps. NoGaps doesnt allow gaps
between a ValidTo field of one record and ValidFrom field of the next record.
Inserts
When
inserting a new record, existing record's ValidTo field is updated and then the
new record is inserted.
Selects
In
case of select statements, all records effective in the date range provided are
selected. Refer code below.
dateFrom
= 01/01/1900;
dateTo
= 31/12/2154;
while
select validTimeState(dateFrom, dateTo) * from address
{
info(address.address);
}
Updates
In
case of updates, a new enum ValidTimeStateUpdate
is introduced.
It
has 2 possible selections.
1.
Correction - ValidFrom and ValidTo values of existing rows are updated to
maintain data validity after the update_recordset statement. No new records can
be created during this mode.
2.
CreateNewTimePeriod - new record is inserted to maintain data validity after
the update_recordset statement.
Deleting
a current record in a ValidTimeState enabled table, will update the previous
record's ValidTo date to current record's ValidTo date.
Query classes
Methods
added to the Query class enabling querying valid time state tables.
1. ValidTimeStateAsOfDate()
//returns records effective as of the date parameter specified qry.validTimeStateAsOfDate(dateMax);
2.
ValidTimeStateAsOfDateTime()
//returns records effective as of the dateTime parameter specified qry.validTimeStateAsOfDateTime(dateTime);
3.
ValidTimeStateDateRange()
//returns records effective between the two dates qry.validTimeStateDateRange(dateMin,
dateMax);
4.
ValidTimeStateDateTimeRange()
//returns records effective between the two dates and times qry.validTimeStateDateTimeRange(dateTimeMin,
dateTimeMax);
Using this table as a DataSource in
Forms
Two
properties are provided on datasources
1. ValidTimeStateAutoQuery Value AsOfDate
returns records on that date and value DateRange returns all the records
2. ValidTimeStateUpdate
CreateNewTimePeriod
- Existing records are not modified instead new records are created. If this value
is selected, you cant select DateRange in ValidTimeStateAutoQuery.
Correction - Allows updates to existing records. New records
are not created.
EffectiveBased - Records in the past cannot be edited.
Records that are currently active are edited in a manner similar to
CreateNewTimePeriod mode. Future records are edited in a manner similar to
Correction mode.
In AX 2012, a table can derive from another table. Two
properties SupportInheritance and Extends together control table
inheritance
Few important points to remember:
1. Table inheritance is described in terms of base table and derived table. Terms Parent/Child table are used to describe
foreign key relationships.
2. When a row is inserted into a derived table, AX kernel
inserts the fields from the derived table into the derived table and the fields
from the base table into the base table.
3.
The RecId field in both the base and derived tables is the same.
4. The
InstanceRelationType field on the base table stores the Id of the derived table
that the record originated in.
5. In case there are more
than 2 tables in the hierarchy, a field relationType is also filled by the AX
kernel. The
relationType field stores the Id for the table directly above the current table
in the hierarchy. The field in invisible in Table browser but can be seen in
SQL.
6. Deleting a record in a base table
or a derived table will automatically cascade delete the record in other table(s).
Downcasting
Downcasting
is casting a base table to a derived table. If a base table has more than one
table derived from it and you cast to a derived table, you will see the fields in
the derived and base tables that exist for that record.
Syntax for downcasting from TableDerived1 to TableDerived2
:
TableDerived1 tableDerived1;
TableDerived2 tableDerived2;
select * from tableDerived1
where tableDerived1.Field1 == 'Demo';
if(tableDerived1 is TableDerived2)
//is keyword
{
tableDerived2 = tableDerived1 as TableDerived2; //as
keyword
}
is and as - the new yin and yang?
The "is" operator
returns true if the table is a derived of the base table, or if the object is
the same type as the class.
The
"as" keyword is used to downcast a base table variable to a
derived table variable. The "as" keyword tells the compiler
that you believe the downcast will be valid during run time. The "as"
keyword applies to the downcasting of both tables and classes. If the cast
is not valid at runtime, null is assigned to the variable.
Like
downcasting, we have upcasting as well. More on that later.
Also,
once a table has been downcasted to a type using the "as" keyword,
the methods on that table are available for use as are the methods on its base
table.
Abstract err... table?
The
Abstract property on a table indicates that a table buffer cannot be
instantiated directly. It can only be instantiated through its descendent/derived
tables. This is very similar in concept to an abstract class.
Derived
Data Sources
If
you drop a base table as a datasource in a form, a new type of node called
Derived Datasources appears. The Derived Datasources node on a form contains
all of the tables that inherit from the base table added as a data source to
that form.
If
a form is using a data source that has multiple derived data sources, the query
the form uses to retrieve data can be very expensive. To reduce the size of the
query use the OnlyFetchActive
property located on a form data source. When the OnlyFetchActive property is set to Yes the query generated by the
form only joins to the tables that have bound controls on the form's design.
Very
interesting concept indeed. But table inheritance should be used sparingly and only where it truly makes sense. Because
it has its own performance degradations.